Overview
You will learn the correct raw-process workflow to keep your photos undamaged during color correction, grading and compositing.
Objectives
Navigate the ACR and Photoshop interface to learn the tools and where to access them. Understand the concepts behind the color process, the steps in the raw process, formats and bit depth to get the most out of your software and photography.
Lesson Plan
-
Camera Raw Settings
- Preferences
- Open all compatible Jpgs and Tiffs.
- Auto defaults
- Save settings as sidecar files
- Sharpen preview only
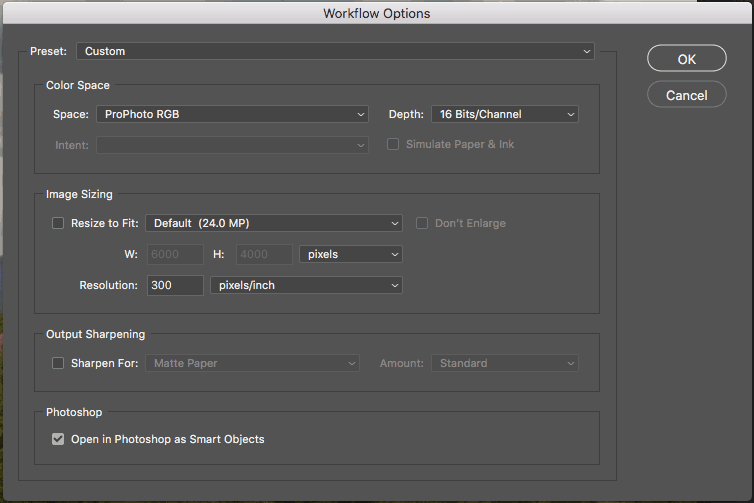
- Workflow Options
- Colorspace
- Adobe RGB most cases
- Pro photo – wider gamut√
- sRGB -straight to web
- 16 Bit
- Sharpen for none (only final output)
- Open as Smart Object
- Adjustments
- What are your plans for the image?
- Further editing in photoshop?
- For web or print?
- Here we’ll use the best
workflow for both
- What would make the photo look better?
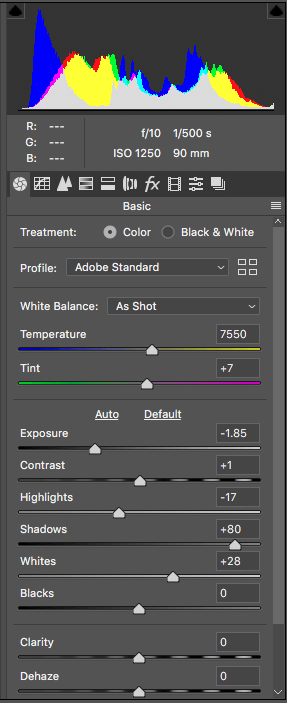
- Controls
- Color balance/White Balance tool
- Exposure
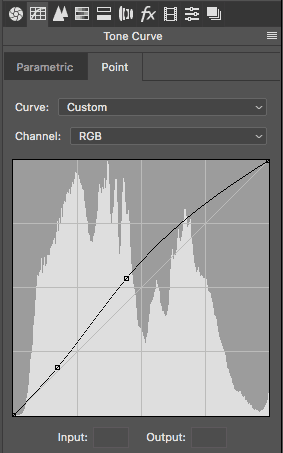
- Curves
- Convert to grayscale
- HSL
- Split toning
- Sharpening (last)
- Amount – Radius – Detail –
- Luminance Noise reduction
- Color noise reduction – 25
- Open
- In Photoshop as Smart Object
-
Photoshop Adjustments
- Selection techniques
- Luminance masks
- Select color range method
- Highs, Mids, Shadows
- Threshold blending method
- Channels
- With levels adjustment
- With other selection tools
- Calculations
- Quick mask
- Quick selection
- Adjustment Layers
- HSL color isolation
- Levels
- Blending modes
- Prep for export.
- Grading
- Flatten
- sharpen/denoise
- Image reduction
- Save.
- Try it on your own photos
Refer to: the Photoshop History Log to reiterate in the future
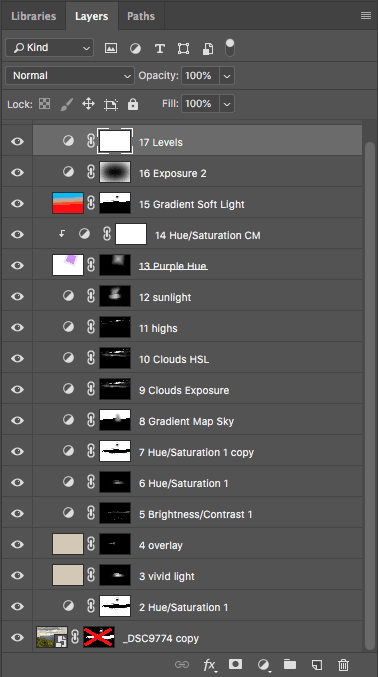
Layers Walkthrough
- _DSC9774 as smart object
- Double click image to re-adjust ACR settings
- HSL adjustment layer 1 -new adjustment layer
- Select green channel
- Crank Hue+Saturation way up
- Click+drag color range slider until the desired area is affected
- Properties – Adjust Hue+Saturation to desired color + lightness
- Green channel
- H: -25
- S: +35
- L: 0
- Master
- H: 0
- S: 0
- L: +9
- Hide HSL adjustment layer
- Create new Levels adjustment layer
- View BLUE channel
- Window, channels, BLUE
- Levels adjustment layer Properties
- Adjust sliders to increase contrast and silhouette edge of tree-line
- Cmd+click channel to select it
- Subtract sky from selection
- W for wand (quick selection tool)
- Hold Option, paint sky to subtract from selection
- Select Inverse
- Cmd+Shift+I
- Mask sky
- with mask selected and black BG color, press delete.
- Save Selection as “Sky+Trees”
- Delete Levels layer
- Hide adjustment layer
- Vivid light
- Create new layer
- Select color range
- Localized color√
- Select center Mtn. highlights/mids
- Adjust range and fuzziness
- Make mask
- Select empty image layer
- Sample sky off-white color with eyedropper tool
- Fill with foreground color (not mask)
- Make blending mode “vivid light”.
- Hide layer
- Overlay
- Repeat layer 3 on distant mountains
- Make blending mode “overlay
- Hide layer
- Brightness contrast – new adjustment layer
- Select color range
- Midtones
- Adjust sliders until Mtn. Highlights are selected
- Properties
- Brightness: 131
- Contrast: 0
- Turn off layers
- Hue Saturation – new adjustment layer
- Load selection “Sky+Trees”
- Invert selection “Cmd+Shift+I
- Select color range
- Sample localized
- Foreground hills+mtn.
- B for brush on mask valley shadows
- Flow 9%
- X to swithc FB and BG colors
- Add to skyline
- Properties
- Set red channel
- H -24
- S +5
- L +13
- Color range: 209º/238º 269º\298º
- Set master channel
- H +176
- S +56
- +43
- Hue Saturation copy
- Duplicate layer 6
- Opt+Click+drag layer 6 to top layer
- Change Lightness to +13
- Replace layer mask
- Opt+Click+drag layer 2 mask on top of layer 7 mask
- Replace
- Blending mode “Linear dodge (add)”
- Gradient Map Sky -new adjustment layer
- Load selection “Sky and Trees”
- Deselect trees
- M for marquis (rectangle)
- Holding Opt click and drag to Select lower portion (trees)
- Save selection as Sky
- B for brush
- Soft, 50% grey, Add mode
- Opt+click+drag to change brush size
- Brush in light haze from sun to mtn
- Make blending mode “overlay”
- Clouds Exposure – new adjustment layer
- Select red channel
- Create Levels adjustment layer
- View red channel, adjust levels to select cloud detail
- Cmd+click to select channel
- Make mask from selection
- Load selection “Sky”
- With black BG color, delete
- Hide “Levels” layer
- Properties
- E: -67
- O: .2311
- G: +1.11
- Clouds HSL -new adjustment
- Duplicate mask from layer 9
- Opt.+Click+Drag mask
- Properties
- Reds
- H: -7
- S: +76
- L: +81
- Color range: 357º/26º 56º\86º
- Master
- H: 0
- S: +69
- L: +54
- Curves Highs -new adjustment
- Select color range
- Sample white (sun)
- Uncheck localized
- Adjust fuzziness to 18
- Properties
- RGB
- Input: 72 Output: 39
- Input: 166 Output: 127
- RED
- Input: 39 Output: 61
- Input: 161 Output: 215
- GREEN
- Input: 139 Output: 114
- BLUE
- Input: 128 Output: 58
- Sunlight Curves -new adjustment layer
- Replace layer mask with layer 2 mask
- invert : Cmd+I
- Radial Gradient
- Blend mode: Darken
- Click and drag out from Mtn peak
- Reverse if needed
- B for brush
- soft/50% grey/add/flow 4-9
- Brush-in sun glow
- Layer settings
- opacity 28%
- Blend mode overlay
- Properties
- RGB
- Input: 69 Output: 89
- Input: 184 Output: 216
- RED
- Input: 39 Output: 61
- Input: 161 Output: 215
- GREEN
- Input: 139 Output: 114
- BLUE
- Input: 128 Output: 58
- Purple Hue
- G for gradient
- Select diamond gradient
- Adjust colors (purple+white)
- Tool blend mode: Normal
- Click and drag from sun
- Layer blend mode: overlay
- Make mask
- Draw similar gradient
- Hue Saturation CM
- Master
- H: 0
- S: -27
- L: -44
- Right click layer
- Choose: Make clipping mask
- Now it only affects the layer below it
- Gradient Soft LIght
- Create new layer
- Duplicate mask from layer 7
- Opt+Click+Drag mask to layer 15
- M for Marquis (rectangle)
- Delete trees
- B for Brush
- Soften edges in sky
- Select image
- G for gradient (linear gradient)
- Blend mode: Normal
- Drag vertically (reverse if needed)
- Layer blend mode: Soft Light
- Exposure 2 -new adjustment
- Select mask
- M for Marquis (ellipse)
- Click+Drag from corner to corner
- Feather mask 870 px
- Properties
- Exposure: -162
- Offset: 0
- Gamma: 1.17
- Levels -new adjustment layer (or make visible+drag to top)
- RGB
- Input
- 7, 1.15, 242
- Output
- 0, 254
Done!
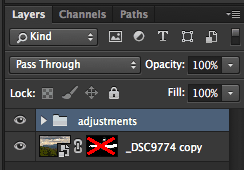
Now select all adjustments and hit Cmd+G to make them a group.
Save
Other uses for these techniques
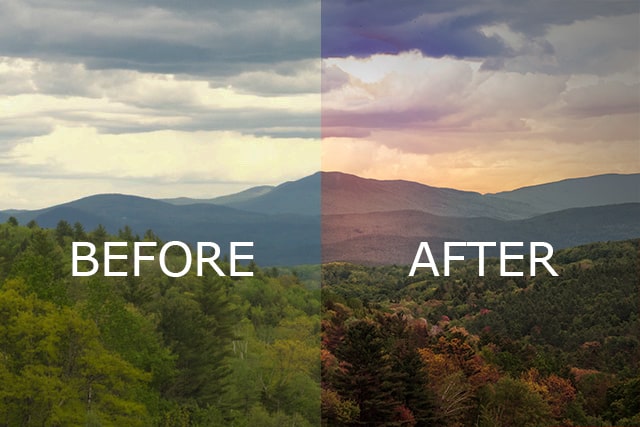
By understanding color information and how to preserve it while making adjustments and the difference between working and output formats you can maximize control over your image during every step up to publication. If we can work with layers, resize, isolate colors and mask images, many artistic possibilities open up to us. Having an overview of the digital color process is necessary for making right decisions for all digital art and photography. |
|
Materials
Drive Folder
Practice Image
File Types Cheat Sheet
Photoshop Reference Guide (print)
Other Resources
DNG Converter
Photoshop Reference Guide (web)
Photoshop History Log
|