resource files: Lesson 2

Photoshop Crash Course


Background Replacement / Retouch

07-18-18

This Lesson Covers:

  • Understand image resolution and size.
  • View and access files in Adobe Bridge.
  • Straighten and crop an image.
  • Adjust the tonal range of an image.
  • Use the Spot Healing Brush tool to repair part of an image.
  • Use the content-aware Patch tool to remove or replace objects.
  • Use the Clone Stamp tool to touch up areas.
  • Remove digital artifacts from an image.
  • Apply the Smart Sharpen filter to finish retouching photos

Lesson Plan 2

Photoshop includes a variety of tools and commands for improving the quality of a photographic image. This lesson steps you through the process of acquiring, resizing, and retouching a vintage photograph.

Summary

  1. • Understand image resolution and size.
  2. • View and access files in Adobe Bridge.
  3. • Straighten and crop an image.
  4. • Adjust the tonal range of an image.
  5. • Use the Spot Healing Brush tool to repair part of an image.
  6. • Use the content-aware Patch tool to remove or replace objects.
  7. • Use the Clone Stamp tool to touch up areas.
  8. • Remove digital artifacts from an image.
  9. • Apply the Smart Sharpen filter to finish retouching photos

Prerequisites

Software and basic computer skills

Adobe Photoshop CC : Free trial at- https://www.adobe.com/products/catalog.html

Identify “Cmd” “Alt/Option” and “Ctrl” buttons on your keyboard

Mouse Operations: Click, Right Click/Ctrl+Click, Mouse-Over (Hover), Click+Drag (Scrub), Shift+Click, Opt+Click


Download or Copy Project files: Lesson 2: 02start.tif, End.psd and bike.tif

Reset Workspace Settings: to alleviate navigation semantics

-Launch Photoshop CC and Hold Cmd+Shift+Opt. (mac) / Ctrl+Alt+Shift (Windows)

Strategy for retouching

How much retouching you do depends on the image you’re working on and your goals for it. For many images, you may need only to change the resolution, lighten the image, or repair a minor blemish. For others, you may need to perform several tasks and employ more advanced tools and techniques.

Note:

In this lesson, you retouch an image using Photoshop. For some images, such as those saved in camera raw format, it may be more efficient to work in Adobe Camera Raw, which is installed with Photoshop. You’ll learn about the tools Camera Raw has to offer in Lesson 12, “Working with Camera Raw.”

Organizing an efficient sequence of tasks

Most retouching procedures follow these general steps, though not every task may be necessary for all projects:

  • Duplicating the original image; working in a copy of the image file makes it easy to recover the original later if necessary
  • Ensuring that the resolution is appropriate for the way you’ll use the image
  • Cropping the image to its final size and orientation
  • Removing any color casts
  • Adjusting the overall contrast or tonal range of the image
  • Repairing flaws in scans of damaged photographs (such as rips, dust, or stains)
  • Adjusting the color and tone in specific parts of the image to bring out highlights, midtones, shadows, and desaturated colors
  • Sharpening the image

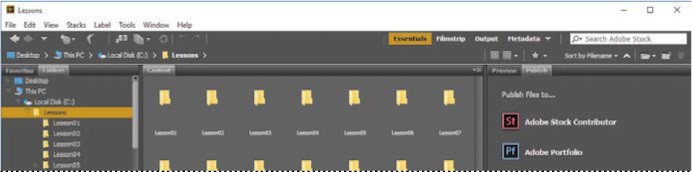
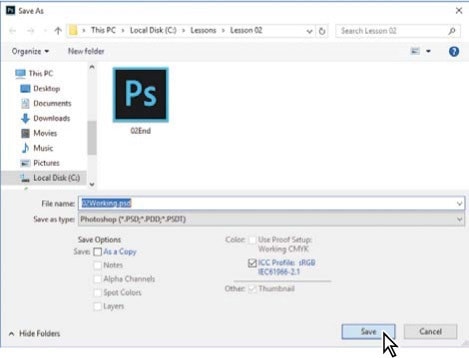
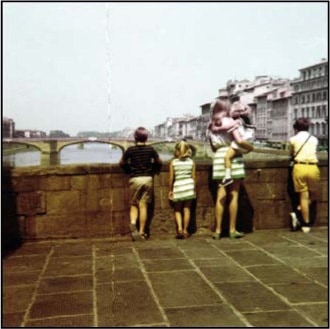
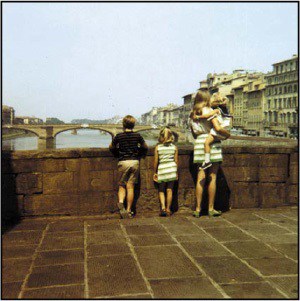
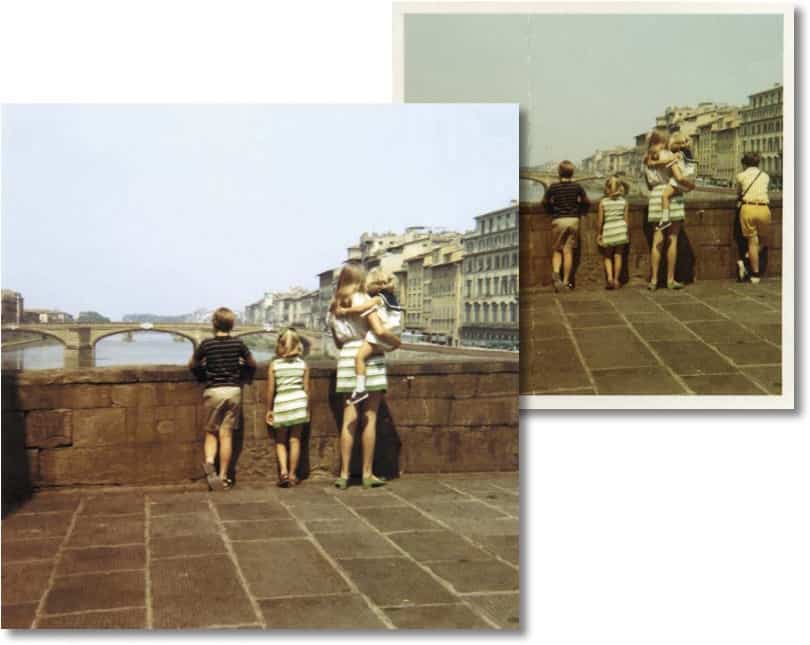
The order of the tasks may vary depending on the project, though you should always start by duplicating the image and adjusting its resolution. Sharpening should usually be your final step. For the other tasks, consider your project and plan accordingly, so that the results of one process do not cause unintended changes to other aspects of the image, making it necessary for you to redo some of your work.

Adjusting your process for different intended uses

The retouching techniques you apply to an image depend in part on how you’ll use the image. Whether an image is intended for black-and-white publication on newsprint or for full-color online distribution affects everything from the resolution of the initial image to the type of tonal range and color correction that the image requires. Photoshop supports RGB color mode for web and mobile device authoring along with desktop photo printing, CMYK color mode for preparing an image for printing using process colors, Grayscale mode for black and- white printing, and other color modes for more specialized purposes.

Resolution and image size

When you edit an image in Photoshop for a specific use, you need to make sure the image contains an appropriate number of pixels, the small squares that describe an image and establish the degree of detail it contains. You can work this out from the pixel dimensions, or the number of pixels along an image’s width and height.

Note:

In Photoshop, the 100% view does not preview the image’s ppi value (resolution); the image is shown at the ppi value of your display. In other words, at 100% zoom, each display pixel shows one image pixel. When you multiply an image’s width by its height in pixels, you find out how many pixels are in the image. For example, a 1000 × 1000 pixel image has 1,000,000 pixels (one megapixel), and a 2000 × 2000 pixel image has 4,000,000 pixels (four megapixels). Pixel dimensions affect file size and upload/download time.

Note:

For computer displays and televisions, the term resolution often describes only the pixel dimensions (such as 1920 × 1080 pixels) instead of a pixel density ratio (300 pixels per inch). In Photoshop, resolution is the pixels per inch value, not the pixel dimensions.

In Photoshop, resolution means the number of pixels per unit of physical length, such as pixels per inch (ppi). Does changing resolution affect file size? Only when the pixel dimensions change. For example, a 7 × 7 inch image at 300 ppi is 2100 × 2100 pixels; if you change either the size in inches or the ppi value (resolution) while keeping the pixel dimensions at 2100 × 2100 pixels, the file size does not change. But if you change the size in inches without changing the ppi value (or vice versa), the pixel dimensions must change, and so will the file size. For example, if the image in the above example is changed to 72 ppi while maintaining 7 × 7 inches, the pixel dimensions must change to 504 × 504 pixels, and the file size decreases accordingly. Resolution requirements vary depending on the intended output. An image might be considered low resolution when its ppi value is below 150 to 200 ppi. An image with a ppi value above 200 ppi is generally considered high resolution because it can contain enough detail to take advantage of the device resolution offered by commercial or fine art printers and high-resolution (Retina/HiDPI) device displays.

Note

To determine the resolution needed for an image you’ll print on a press, follow this industry guideline: Edit the image to a ppi value that is 1.5 to 2 times the halftone screen frequency (in lines per inch, or lpi) used by the printer. For example, if the image will be printed using a screen frequency of 133 lpi, the image should be 200 ppi (133 × 1.5).

Factors such as viewing distance and output technology influence the resolution our eyes actually perceive, and this affects resolution requirements too. A 220- ppi laptop display may appear to have the same high resolution as a 360-ppi smartphone, because the laptop is viewed farther away. But 220 ppi might not be enough resolution for a high-end printing press or fine art inkjet printer, which might reproduce the most detail at 300 ppi and up. At the same time, a 50-ppi image can appear perfectly sharp on a highway billboard because it’s seen from hundreds of feet away. Because of the way display and output technologies work, your images may not need to match the device resolution of high-resolution printers. For example, while some commercial printing platesetters and photo-quality inkjet printers may have a device resolution of 2400 dots per inch (dpi) or more, the appropriate image resolution to send to those devices may be only 200 to 360 ppi for photos. This is because the device dots are grouped into larger halftone cells or inkjet dot patterns that build tones and colors. Similarly, a 500-ppi smartphone display may not necessarily require 500-ppi images. Whatever your medium, you should verify the appropriate image resolution of your final images by consulting with your production team or output service provider.

Procedure

Opening a file with Adobe Bridge

In this lesson, you’ll retouch a scan of a damaged and discolored vintage photograph so it can be shared or printed. The final image size will be 7 × 7 inches.

Note

If Bridge isn’t installed, you’ll need to install it from Adobe Creative Cloud. For more information, see page 3.

In Lesson 1, you used the Open command to open a file. You’ll start this lesson by comparing the original scan to the finished image in Adobe Bridge, a visual file browser that helps take the guesswork out of finding the image file that you need.

  1. Start Photoshop, and then immediately hold down Ctrl+Alt+Shift (Windows) or Command+Option+Shift (Mac) to reset the default settings.
  2. When prompted, click Yes to confirm that you want to delete the Adobe Photoshop Settings file.
  3. Choose File > Browse In Bridge. If you’re prompted to enable the Photoshop extension in Bridge, click Yes or OK.

Note:

If Bridge asks you if you want to import preferences from a previous version of Bridge, select Don’t Show Again, and click No. Adobe Bridge opens, displaying a collection of panels, menus, and buttons.

  1. Select the Folders tab in the upper left corner, and then browse to the Lessons folder you downloaded onto your hard disk, so that the lessons in the Lessons folder appear in the Content panel.
  2. With the Lessons folder still selected in the Folders panel, choose File > Add To Favorites. Adding files, folders, application icons, and other assets that you use often to the Favorites panel lets you access them quickly.
  3. Select the Favorites tab to open the panel, and click the Lessons folder to open it. Then, in the Content panel, double-click the Lesson02 folder. Thumbnail previews of the folder contents appear in the Content panel.
  4. Compare the 02Start.tif and 02End.psd files. To enlarge the thumbnails in the Content panel, drag the thumbnail slider at the bottom of the Bridge window to the right.

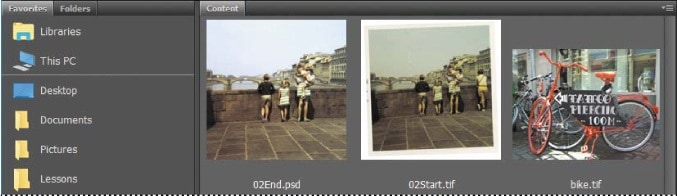
Tip:

In Bridge, you can see a larger preview of a selected item by displaying the Preview panel (choose Window > Preview Panel). In the 02Start.tif file, notice that the image is crooked, the colors are relatively dull, and the image has a green color cast and a distracting crease. You’ll fix all of these problems in this lesson, and a few others. You’ll start by cropping and straightening the image.

  1. Double-click the 02Start.tif thumbnail to open the file in Photoshop. Click OK if you see the Embedded Profile Mismatch dialog box.
  2. In Photoshop, choose File > Save As. Choose Photoshop from the Format menu, and name the file 02Working.psd. Then click Save.

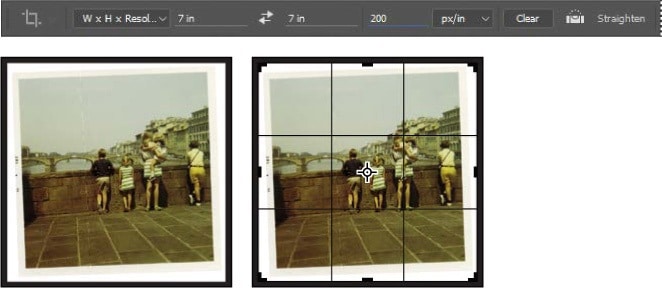
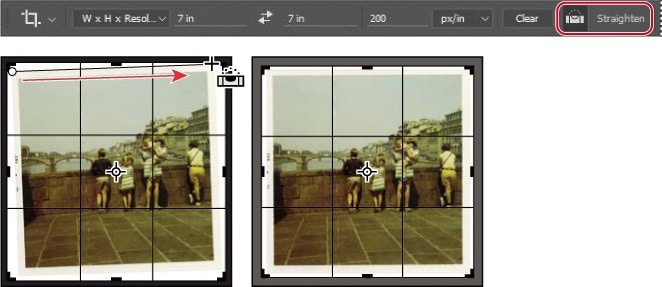
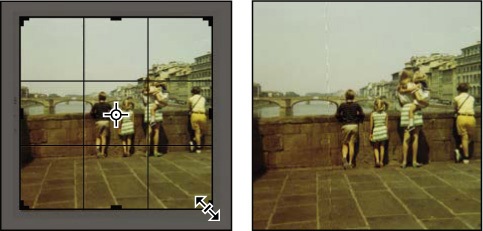
Straightening and cropping the image in Photoshop

You’ll use the Crop tool to straighten, trim, and scale the photograph. By default, cropping deletes cropped pixels.

  1. In the Tools panel, select the Crop tool ( ). Crop handles appear, and a crop shield covers the area outside the cropping region, to help focus your attention on the cropped area.

Tip:

Deselect the Delete Cropped Pixels option if you want to crop nondestructively, so that you can revise the crop later.

  1. In the options bar, choose W × H × Resolution from the Preset Aspect Ratio menu. (Ratio is the default value.)
  2. In the options bar, type 7 in for the width, 7 in for the height, and 200 px/in for the resolution. A crop grid appears. First, you’ll straighten the image.
  3. Click the Straighten icon in the options bar. The pointer changes to the Straighten tool.
  4. Click at the top left corner of the photo, press the mouse button as you drag a straight line across the top edge of the photo, and then release. Photoshop straightens the image so that the line you drew is parallel with the top of the image area. You drew a line across the top of the photo, but any line that defines either the vertical or horizontal axis of the image will work. Now, you’ll trim the white border and scale the image.
  5. Drag the corners of the crop grid inward to the corners of the photo itself to crop out the white border. If you need to adjust the position of the photo, click and drag it within the crop grid.
  6. Press Enter or Return to accept the crop. The image is now cropped, and the cropped image fills the image window, straightened, sized, and positioned according to your specifications.

Tip:

To quickly straighten a photo and crop out the scanned background, choose File > Automate > Crop And Straighten Photos. It can also automatically separate multiple photos scanned in one image.
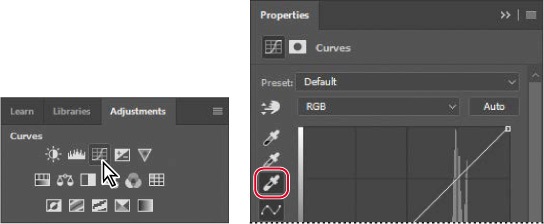
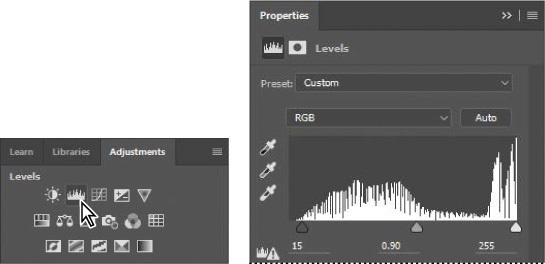
  1. To see the image dimensions, choose Document Dimensions from the pop-up menu at the bottom of the application window.
  2. Choose File > Save to save your work. Click OK if you see the Photoshop Format Options dialog box.

Adjusting the color and tone

You’ll use Curves and Levels adjustment layers to remove the color cast and adjust the color and tone in the image. The Curves or Levels options may look complex, but don’t be intimidated. You’ll work with them more in later lessons; for now, you’ll take advantage of their tools to quickly brighten and adjust the tone of the image.

  1. 1 Click Curves in the Adjustments panel to add a Curves adjustment layer.
  2. Select the White Point tool on the left side of the Properties panel.

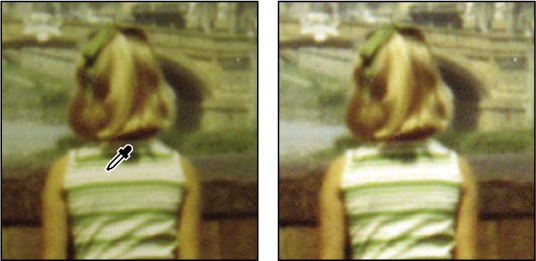
Tip:

If the Libraries panel is open and taking up a lot of screen space, go ahead and collapse or close it, because it won’t be used in this lesson. Specifying a white point changes all the colors in the image. The white point is the color that Photoshop defines as pure white, and it adjusts all other colors accordingly. To set an accurate white point, select an area of the image that should be the brightest neutral area of the image that should hold detail.

  1. Click a white stripe on the girl’s dress. The color tone of the image changes dramatically. You can click different white areas, such as the child’s sailor dress, a stripe on the woman’s dress, or the girl’s sock, to see how each selection changes the color. In some images, adjusting the white point is enough to remove a color cast and correct the tone of the image. Here, selecting a white point is a good start. You’ll use a Levels adjustment layer to fine-tune the tone.
  2. Click the Levels icon ( ) in the Adjustments panel to add a Levels adjustment layer.

Note:

The color and tone edits in this section are relatively basic; it’s possible to do them all using only Levels or Curves. Typically, Curves is used for edits that are more specialized or complex. The Levels histogram in the Properties panel displays the range of dark and light values in the image. You’ll learn more about working with levels in later lessons. Right now, you just need to know that the left triangle represents the black point (the point Photoshop defines as the darkest in the image), the right triangle represents the white point (the lightest in the image), and the middle triangle represents the midtones.
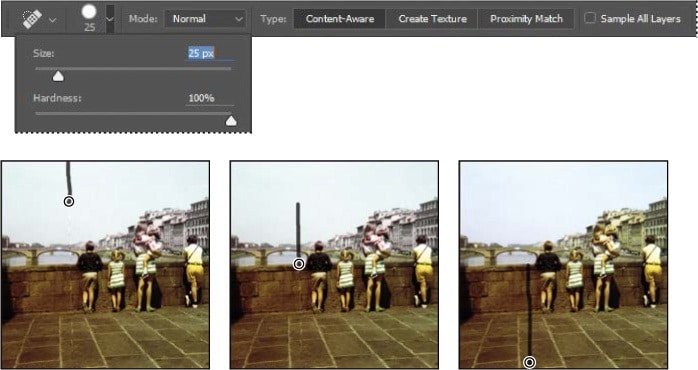
  1. Drag the left triangle (black point) under the histogram to the right, where significant shadow tones start to appear. Our value was 15.
  2. Drag the middle triangle a little to the right to adjust the midtones. Our value was .90. Now that you’ve adjusted the color, you’ll flatten the image so it’s easier to work with while you touch it up. Flattening an image merges all of its layers into the Background layer, which reduces the file size; you can still make changes to the entire image. But only flatten if you no longer need the flexibility of adjusting the edits you previously made using separate layers.
  3. Choose Layer > Flatten Image. The adjustment layers merge with the Background layer.


Using the Spot Healing Brush tool

The next task is to remove the crease in the photo. You’ll use the Spot Healing Brush to erase the crease. While you’re at it, you’ll use it to address a few other issues.

Note:

The Healing Brush tool works similarly to the Spot Healing Brush tool, except that it requires you to sample source pixels before retouching an area.

The Spot Healing Brush tool quickly removes blemishes and other imperfections. It samples pixels around the retouched area and matches the texture, lighting, transparency, and shading of the sampled pixels to the pixels being healed. The Spot Healing Brush is excellent for retouching blemishes in portraits, but also works nicely wherever there’s a uniform appearance near the areas you want to retouch.

  1. Zoom in to see the crease clearly.
  2. In the Tools panel, select the Spot Healing Brush tool ( ).
  3. In the options bar, open the Brush pop-up panel, and specify a brush with a size of about 25 px and 100% Hardness. Make sure Content-Aware is selected in the options bar.

Tip:

To avoid creating obvious new seams or patterns, paint the Spot Healing Brush closely around the area you’re repairing. Don’t cover more area than necessary.
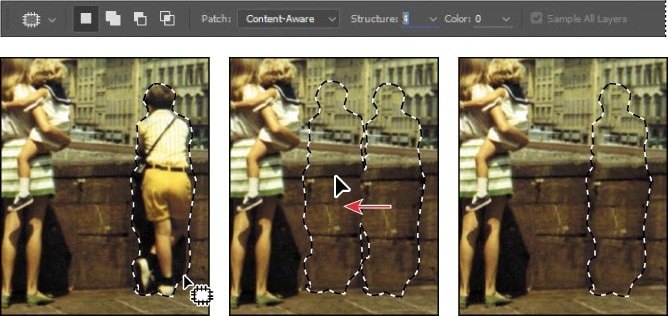
  1. In the image window, drag the Spot Healing Brush down from the top of the crease. You can probably repair the entire crease with four to six neat downward strokes. As you drag, the stroke at first appears black, but when you release the mouse, the painted area is “healed.”
  2. Zoom in to see the white hair in the upper right area of the image. Then select the Spot Healing Brush again, and paint over the hair.
  3. Zoom out, if necessary, to see the full sky. Then click the Spot Healing Brush wherever there are dark areas you want to heal.
  4. Save your work so far.

Applying a content-aware patch

Use the Patch tool to remove unwanted elements from an image. You’ll use a content-aware patch to remove an unrelated person from the right side of the photo. In Content-Aware mode, the Patch tool creates nearly seamless blending with the nearby content.

  1. In the Tools panel, select the Patch tool ( ), hidden under the Spot Healing Brush tool ( ).
  2. In the options bar, choose Content-Aware from the Patch menu, and make sure that Sample All Layers is selected. Type 4 into the Structure slider. The Structure menu determines how closely the patch reflects the existing image patterns. You can choose from 1 to 7, with 1 allowing the loosest adherence to the source structure and 7 requiring the strictest.
  3. Drag the Patch tool around the boy and his shadow, as closely as possible. You may want to zoom in to see him more clearly.
  4. Click within the area you’ve just selected, and drag it to the left. Photoshop displays a preview of the content that will replace the boy. Keep dragging to the left until the preview area no longer overlaps the area occupied by the boy, but without overlapping the woman or the girl she’s holding. Release the mouse button when the patch is positioned where you want it. The selection changes to match the area around it. The boy is gone, and where he stood is a section of the bridge wall and of a building.
  5. Choose Select > Deselect. The effect was pretty impressive, but not quite perfect. You’ll touch up the results next.

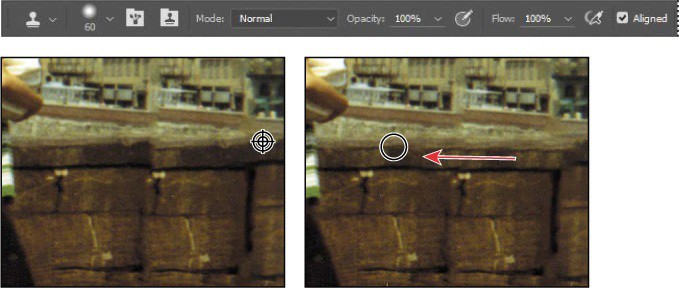
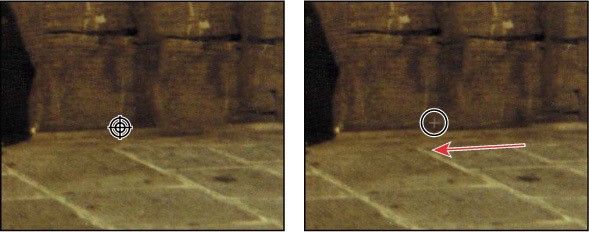
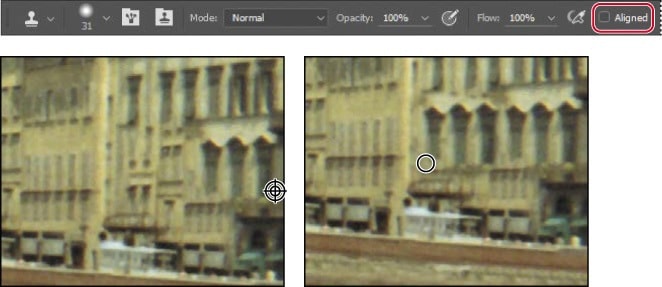
Repairing areas with the Clone Stamp tool

The Clone Stamp tool uses pixels from one area of an image to replace the pixels in another part of the image. Using this tool, you can not only remove unwanted objects from your images, but you can also fill in missing areas in photographs you scan from damaged originals. You’ll use the Clone Stamp tool to smooth out some irregularities in the height of the bridge wall and the windows on the building.
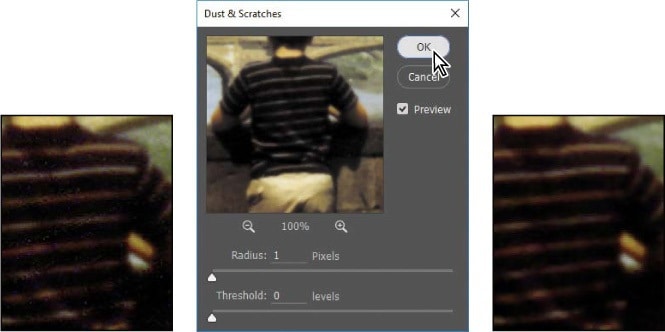
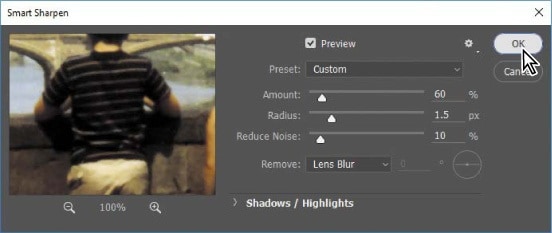
  1. Select the Clone Stamp tool ( ) in the Tools panel, and select a 60-px brush with 30% Hardness. Make sure that the Aligned option is selected.
  2. Move the Clone Stamp tool to an area where the top of the bridge wall is smooth. That’s the area you want to copy to smooth out the area that was patched.
  3. Alt-click (Windows) or Option-click (Mac) to start sampling that part of the image. (When you press Alt or Option, the pointer appears as target crosshairs.)
  4. Drag the Clone Stamp tool across the top of the bridge wall in the patched area to even it out, and then release the mouse button. Each time you click the Clone Stamp tool, it begins again with a new source point, in the same relationship to the tool as the first stroke you made. That is, if you begin painting further right, it samples from stone that is further right than the original source point. That’s because Aligned is selected in the options bar. Deselect Aligned if you want to start from the same source point each time.
  5. Select a source point where the bottom of the bridge wall is even, and then drag the Clone Stamp tool across the bottom of the wall where you patched it.
  6. Select a smaller brush size, and deselect Aligned. Then select a source point over the rightmost windows in the lowest row on the building you patched. Click across to create accurate windows there.
  7. Repeat step 6 to make any adjustments you want to apply to the lowest area of the building and the wall that runs in front of it.
  8. If you like, you can use a smaller brush size to touch up the stones in the patched portion of the wall.
  9. Save your work.

Sharpening the image

The last task you might want to do when retouching a photo is to sharpen the image. There are several ways to sharpen an image in Photoshop, but the Smart Sharpen filter gives you the most control. Because sharpening can emphasize artifacts, you’ll remove those first.

  1. Zoom in to about 400% to see the boy’s shirt clearly. The colored dots you see are artifacts of the scanning process.
  2. Choose Filter > Noise > Dust & Scratches.
  3. In the Dust & Scratches dialog box, leave the default settings with a Radius of 1 pixel and Threshold at 0, and click OK. The Threshold value determines how dissimilar the pixels should be before they are eliminated. The Radius value determines the size of the area searched for dissimilar pixels. The default values are great for tiny dots of color like the ones in this image. Now that the artifacts are gone, you can sharpen the image.
  4. Choose Filter > Sharpen > Smart Sharpen.
  5. In the Smart Sharpen dialog box, make sure that Preview is selected, so you can see the effect of settings you adjust in the image window. You can drag inside the preview window in the dialog box to see different parts of the image, or use the plus and minus buttons below the thumbnail to zoom in and out.
  6. Make sure Lens Blur is chosen in the Remove menu. You can choose to remove Lens Blur, Gaussian Blur, or Motion Blur in the Smart Sharpen dialog box. Lens Blur provides finer sharpening of detail and reduced sharpening halos. Gaussian Blur increases contrast along the edges in an image. Motion Blur reduces the effects of blur that resulted from the camera or the subject moving when the photo was taken.
  7. Drag the Amount slider to about 60% to sharpen the image.
  8. Drag the Radius slider to about 1.5. The Radius value determines the number of pixels surrounding the edge pixels that affect the sharpening. The higher the resolution, the higher the Radius setting should usually be.
  9. When you’re satisfied with the results, click OK to apply the Smart Sharpen filter.
  10. Choose File > Save, and then close the project file.

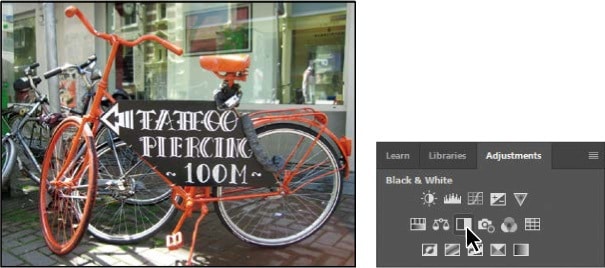
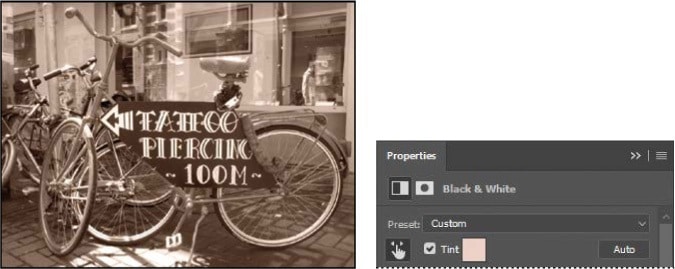
Your image is ready to share or print!

Extra Project

Converting a color image to black and white

You can get great results converting a color image to black and white in Photoshop.

  1. Choose File > Open, and navigate to the bike.tif file in the Lesson02 folder. Click Open.
  2. In the Adjustments panel, click the Black & White button to add a Black & White adjustment layer.
  3. Adjust the color sliders to change the saturation of color channels. You can also experiment with options from the preset menu, such as Darker or Infrared. Or, select the targeted adjustment tool ( ) in the upper left corner of the Properties panel, position it over a color you want to adjust, and drag horizontally. The tool moves the sliders associated with the original color of the pixels where you started dragging; for example, dragging on the red bike frame adjusts the lightness of all red areas. We darkened the bike and made the background areas lighter.
  4. If you want to colorize the entire photo with a single hue, select Tint in the Properties panel. Then, click the color swatch, and select a tint color (we used R=227, G=209, B=198).


Materials

Drive Folder

Practice Image

File Types Cheat Sheet

Photoshop Hot Key Reference Guide 

Other Resources

DNG Converter

Photoshop Reference Guide (web)

Photoshop History Log


 Image Reference